This post may contain affiliate links. Please read our disclosure policy.
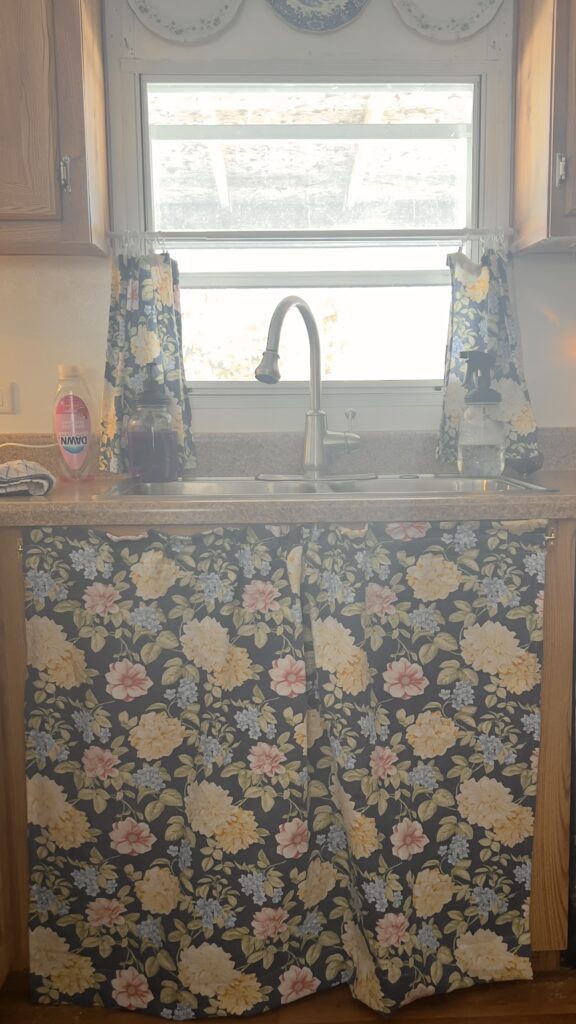
A simple curtain panel for an area of our kitchen that needed a little sprucing up was a quick, afternoon project that turned out to be a great solution for our peeling cabinets. A bright floral print for spring and a ruffled curtain add charm and an old fashioned look to our country kitchen.
A Simple Fix For Our Country Kitchen
Something I have come to learn when living frugally and with the style of house I love, is to be creative with imperfections. Not everything has to be perfectly done like we live in a magazine. When I browse Pinterest, the homes I am drawn to and have pinned time and time again are those filled with antiques used versus modern fixtures (think hutches instead of built in cabinetry, old drawers as shelves, and glass hurricane lamps instead of can lights), and things clearly handmade showing the charm and love of those that live inside.
Everything doesnt have to be perfect and done top notch. Sometimes, covering something cheaply with fabric or paint can add character and be a favorite corner of the home, because it shows life. It shows character. It shows personality. Gone are the days where a cozy home is filled with bright lights, gray walls and floors and personality no where to be seen.
We will be doing the same in our new farmhouse we are building, adding curtains to furniture, handmade or antique items rather than mass produced and built in fixtures, and character filled charm even if it is not “the right way” to do something. We are reaching for charm and beauty with country style. A home that screams it is ours, not someone else’s. Sure, perfect cabinetry could be added if we wanted to save up and spend the time and money doing that. But my style doesn’t lend to a perfect look. I like a little imperfection that shows we use the space.
When our kitchen cabinets in our home now started to show wear and tear (they’re not real wood), I considered painting and sealing just to get the job done. And while I would love a creamy white kitchen versus a wood-inspired kitchen, it is not in the budget. All of our focus and finances are going to the farmhouse. So for the worst cabinet directly under the sink that was peeling from getting wet, adding a curtain with a nice springy floral print was the perfect solution! I have found this kitchen curtain to be better than the cabinet doors allowing for easy access to cleaning supplies and our trashcan that is stashed behind.
I opted for a single panel, rod pocket curtain on the lower cabinets because right above the sink on the kitchen window, I have two cafe curtain panels. One single panel was more functional and gave a more balanced look with the two above. Adding a cheap rod to the outside of the cabinet allowed for an easy yet sturdy fix to get this curtain up.
DIY Kitchen Cabinet Curtains Video
Tools/Equipment
Sewing Machine
Scissors
Seam Ripper
Sewing Tape Measure
Small Curtain Rod or Tension Rod
Drill
How To Make This DIY Kitchen Cabinet Curtain
To determine the dimensions for my curtain, I measured how wide I wanted the final curtain to be and how long I wanted it to be in the end. For my curtain, I was covering up where the doors sat on the outside of the cabinet base so it was a little wider than the cut out area.
Now here is where I messed up. For any ruffled look item, I always multiply the finished width by 1.5 or even 2 sometimes, to ensure the fabric has a nice ruffle rather than laying flat. I didn’t consider this when choosing my favorite Better Homes and Gardens Fabric which was leftover fabric from another project. So the piece of fabric I had was it and I was already starting this project with the kitchen cabinet doors off before I realized. Be sure you have enough fabric width to accomodate the width of the area you are covering x 1.5 for ruffle (if that is the look you are going for) + proper seam allowance. It should also be noted that new fabric will shrink after washed so be sure to buy more than you need and throw it in the washing machine AND dryer before cutting. More on proper measurements now!
To determine width, measure how wide you want fully covered. Mine here was 36 inches. Then it is important to multiple by your ruffle amount of 1.5 or 2 (preference) first. That makes mine 54 inches. Then add on for hem allowance. I always add 1 inch for each hem to allow for me to fold over 1/2 inch and 1/2 inch again. There are two sides to hem in the width so that would add 2 extra inches, make this 56 inches.
For the length, I wanted a wider hem on the bottom, and needed more to fold over on the top to create a rod pocket. To start, I measured how long I wanted the final curtain to be. Mine was 32 inches. Then I added on my bottom hem. I wanted to fold the raw edge under 1/2 inch as a normal hem, but then wanted a thick, final hem on the bottom, around 3 inches. This brought me to 35 1/2 inches. The top hem I knew would need a 1 inch hem to start to hide the raw edge, before creating the pocket for the curtain rod, bringing me to 36 1/2 inches. I wanted a 1 inch pocket with 1 inch on each side, adding an additional 3 inches. The final length of my fabric needed to be 39 1/2 inches.
My final fabric needed to be cut to 56 x 39 1/2.
Now, as stated before I was limited in the amount of fabric I had, so once I had my measurements, I made this work with what I had making my final curtain not quite as ruffled as I would like. If you are planning to make something similar, I would suggest getting your cut list measurements before getting your fabric and making sure you have enough.
But by golly, I chose this fabric and wanted to make it work.
Once I had my fabric ironed and cut, I started with my side hems. I like to start with the side hems to give a nice finished look with how everything is folded and to make sure the rod pocket ends aren’t blocked by the side hems. All that this entailed was folding the raw edge over 1/2 inch and another 1/2 inch. I stitched a straight line seam down each side close to the inside edge, making sure to back stitch at the beginning and end of each seam, on both sides of the curtain panel.
Next, it was time to sew the bottom hem. I started by folding the raw edge under 1/2 inch, then folding it over again 3 inches, pinning as I went. I would fold it over the 3 inches, measure, pin then move on down a couple of inches. Once all pinned, I measured the side, middle and other side to make sure they were even and all 3 inches then added a straight stitch seam all the way down, being sure to back stitch at the beginning and end.
To finish up this curtain, I created the top hem and then the rod pocket.
The top of the curtain was a simple 1 inch hem, folding the raw edge over 1/2 inch and another 1/2 inch then stitching along the inside of the hem. I then folded the top edge down 3 inches, just like with the bottom hem. But instead of stiching it down close to the edge of the fabric, I stitched two straight seams- one 1 inch down from the fold and the other 2 inches down from the fold. This created 3 section on the back, all 1 inch wide.
Once the pocket was sewn, I made sure to trim any threads. My husband, with our 4 year old daughters help, hung the rod on the outside of the cabinet base. If you weren’t trying to cover where the hinges and doors sat, you could opt to use a tension rod on the inside of the cabinet opening. I put the rod through the center of the two stitches, in the center section we created.
I love how this turned out, even if it’s imperfect and not quite as fluffy and ruffled as I’d like. Curtains in unconventional places are one of my favorite things to see in a home. They add a layer of coziness, charm and a splash of pattern. This even has me inspired by kitchen sink skirts for our new farmhouse. It created such a focal point in the kitchen, something I hope to do with an antique sink as well.
FAQ’s
What material to make kitchen curtains?
I used this Better Homes and Gardens Fabric. It is a bit thick but it works wonderfully for any home decorating project. Another great option would be a linen curtain. Of course, a simple cotton gingham print would work wonderfully and I have also made a few out of a thicker ticking stripe. Something lighter will flow more but a thicker fabric will hide what’s behind it better!
How much fabric do I need to make kitchen curtains?
While this depends on what you are creating a curtain for, I would always reccomend at least a yard of fabric unless it is something quite small. You can find the measurements for fabric width on the bolt or the online listing. Then of course, a yard is standard. For my project above that needed a cut (before hemming and sewing) panel of 56 x 39 1/2, I needed 2 yards. This would provide extra width if I wanted to go for more of a double width for a heavier ruffle. A standard fabric size is 45 inches wide, which I use for the length. Depending on the print of your choice of fabric, this can be turned how you need to make the measurements work.
DIY Kitchen Cabinet Curtains How-To Card
DIY Kitchen Cabinet Curtains

A simple curtain panel for an area of our kitchen that needed a little sprucing up was a quick, afternoon project that turned out to be a great solution for our peeling cabinets. A bright floral print for spring and a ruffled curtain add charm and an old fashioned look to our country kitchen.
Materials
- 1-2 yards of fabric of choice
Tools
- Sewing Machine
- Scissors
- Seam Ripper
- Sewing Tape Measure
- Small Curtain Rod or Tension Rod
- Drill
Instructions
- To determine the dimensions for my curtain, I measured how wide I wanted the final curtain to be and how long I wanted it to be in the end. For my curtain, I was covering up where the doors sat on the outside of the cabinet base so it was a little wider than the cut out area.
- Now here is where I messed up. For any ruffled look item, I always multiply the finished width by 1.5 or even 2 sometimes, to ensure the fabric has a nice ruffle rather than laying flat. I didn't consider this when choosing my favorite Better Homes and Gardens Fabric which was leftover fabric from another project. So the piece of fabric I had was it and I was already starting this project with the kitchen cabinet doors off before I realized. Be sure you have enough fabric width to accomodate the width of the area you are covering x 1.5 for ruffle (if that is the look you are going for) + proper seam allowance. It should also be noted that new fabric will shrink after washed so be sure to buy more than you need and throw it in the washing machine AND dryer before cutting. More on proper measurements now!
- To determine width, measure how wide you want fully covered. Mine here was 36 inches. Then it is important to multiple by your ruffle amount of 1.5 or 2 (preference) first. That makes mine 54 inches. Then add on for hem allowance. I always add 1 inch for each hem to allow for me to fold over 1/2 inch and 1/2 inch again. There are two sides to hem in the width so that would add 2 extra inches, make this 56 inches.
- For the length, I wanted a wider hem on the bottom, and needed more to fold over on the top to create a rod pocket. To start, I measured how long I wanted the final curtain to be. Mine was 32 inches. Then I added on my bottom hem. I wanted to fold the raw edge under 1/2 inch as a normal hem, but then wanted a thick, final hem on the bottom, around 3 inches. This brought me to 35 1/2 inches. The top hem I knew would need a 1 inch hem to start to hide the raw edge, before creating the pocket for the curtain rod, bringing me to 36 1/2 inches. I wanted a 1 inch pocket with 1 inch on each side, adding an additional 3 inches. The final length of my fabric needed to be 39 1/2 inches.
- My final fabric needed to be cut to 56 x 39 1/2.
- Now, as stated before I was limited in the amount of fabric I had, so once I had my measurements, I made this work with what I had making my final curtain not quite as ruffled as I would like. If you are planning to make something similar, I would suggest getting your cut list measurements before getting your fabric and making sure you have enough.
- But by golly, I chose this fabric and wanted to make it work.
- Once I had my fabric ironed and cut, I started with my side hems. I like to start with the side hems to give a nice finished look with how everything is folded and to make sure the rod pocket ends aren't blocked by the side hems. All that this entailed was folding the raw edge over 1/2 inch and another 1/2 inch. I stitched a straight line seam down each side close to the inside edge, making sure to back stitch at the beginning and end of each seam, on both sides of the curtain panel.
- Next, it was time to sew the bottom hem. I started by folding the raw edge under 1/2 inch, then folding it over again 3 inches, pinning as I went. I would fold it over the 3 inches, measure, pin then move on down a couple of inches. Once all pinned, I measured the side, middle and other side to make sure they were even and all 3 inches then added a straight stitch seam all the way down, being sure to back stitch at the beginning and end.
- To finish up this curtain, I created the top hem and then the rod pocket.
- The top of the curtain was a simple 1 inch hem, folding the raw edge over 1/2 inch and another 1/2 inch then stitching along the inside of the hem. I then folded the top edge down 3 inches, just like with the bottom hem. But instead of stiching it down close to the edge of the fabric, I stitched two straight seams- one 1 inch down from the fold and the other 2 inches down from the fold. This created 3 section on the back, all 1 inch wide.
- Once the pocket was sewn, I made sure to trim any threads. My husband, with our 4 year old daughters help, hung the rod on the outside of the cabinet base. If you weren't trying to cover where the hinges and doors sat, you could opt to use a tension rod on the inside of the cabinet opening. I put the rod through the center of the two stitches, in the center section we created.
- I love how this turned out, even if it's imperfect and not quite as fluffy and ruffled as I'd like. Curtains in unconventional places are one of my favorite things to see in a home. They add a layer of coziness, charm and a splash of pattern. This even has me inspired by kitchen sink skirts for our new farmhouse. It created such a focal point in the kitchen, something I hope to do with an antique sink as well.
Leave a Reply